
Since the very beginning, DIRECTV receivers have included signal meters which display on the screen. When the service launched in 1994 it was designed for DIYers to aim things for themselves. Forcing them to buy an expensive meter would not have made sense. Of course back in those days it just took aiming the dish at one satellite. It’s a little more complex now.
Using the signal meters
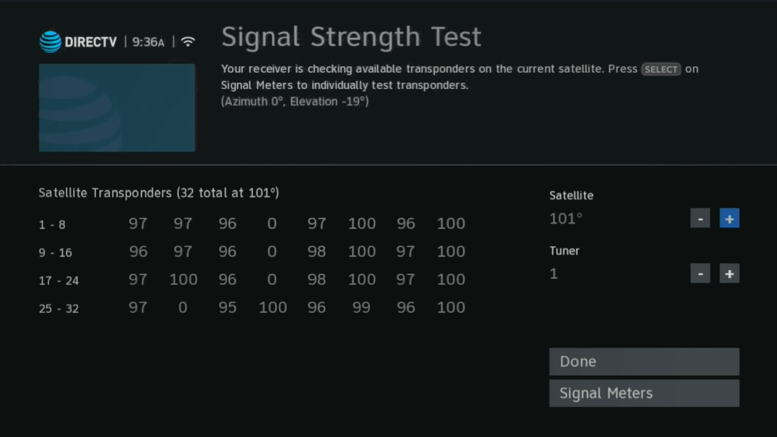
The signal meters on DIRECTV receivers are actually pretty good. They can give you numerical readouts for all tuners, show you all transponders, and even give you audio feedback that help you aim more easily.
One of the big advancements today is that you don’t have to stand in front of the TV and you don’t have to ask a friend to run inside and outside and tell you what they see. When I’m showing people how to aim their own dishes, I recommend skyping (or facetiming, or whatever video chat you want) so you can actually see the screen. Just point one device at the screen and put the other down on the roof. Don’t just hold it, you might need both hands to keep your balance.
A VERY quick primer on how to aim a DIRECTV dish
There are some excellent videos on our YouTube page that go into more detail, but here’s a very quick primer on how to aim your dish.
Get pointing instructions
You can get a rough aiming direction by putting your ZIP code into the receiver. You can also get some information from sites like dishpointer.com. Dishpointer.com is usually more accurate because it uses your actual location, not just your ZIP code. But remember this is a rough number and you’ll be adjusting anywhere.
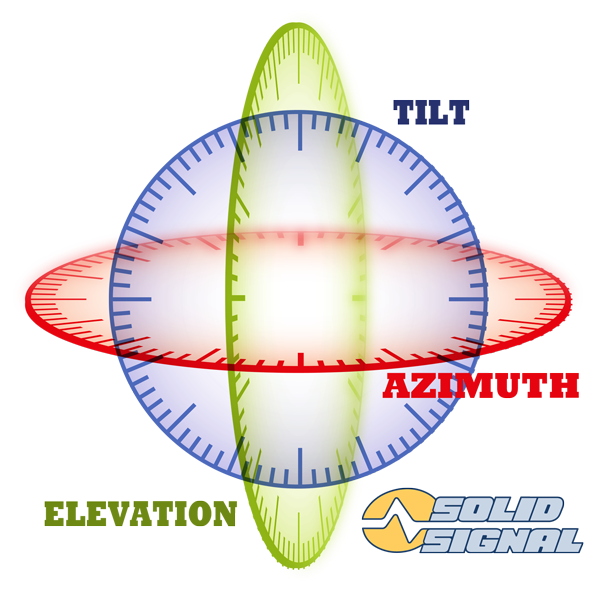
Set the dish to the rough direction you get. There are aiming marks on the back of the dish and on the bottom where the dish attaches to the mount. If you’re not clear on the terms, this graphic shows you what’s what:
Slowly find the 101 satellite
Turning the dish on the mast can help you get the best aim for the 101 satellite. It’s the easiest to get. You can set the signal meters on the TV to show you 101. Get the best strength you can then lock that bolt down so it’s almost tight. You don’t want it moving accidentally
Use tilt and elevation to find 99 and 103
It should only take some very small moves to lock in the 99 and 103 satellites. Usually if you find the 99 nice and strong, the 103 will also come in strong, because they’re all in a line.
Dither
Dithering is the process of turning the adjustment screws half a turn at a time and watching the signal numbers. If they are going up, keep turning until they go down and then turn back half a turn. This helps you get the best signal.
Dither one adjustment at a time, never do more than one adjustment at a time.
Check
Go back and check all the 101, 99 and 103 satellites. Almost every number should be over 85. It’s possible some transponders will be a bit low, that’s normal. If you spend enough time and if you’re careful, you should be able to get almost every number over 90.
Something to be aware of
If you are aiming using the onscreen meters, they can take up to 5 seconds before they show any change. Go nice and slow. If you’re skyping, this can add another second as well. Just be patient.
And now… the real reason for the article.
Now that we’ve given you a little tutorial, let’s talk about what the satellite meters on the screen actually do. They measure the Bit Error Rate, which is the most important measurement of whether or not you’ll get signal in most cases. Bit Error Rate tells the receiver how much of the signal is usable and how much is pure nonsense. It doesn’t usually matter how strong the signal is because with digital signals, you can either get it or you can’t. The number you see is an inverse. If you have signal strength of 100, you have a very low bit error rate. If you have a signal strength of 40, you have a very high bit error rate.
Bit error rate is the right way to measure satellite signal strength in most cases. However it’s not the only way. Most satellite meters measure signals in dBm, which is a measure of the amount of electricity coming down the line. It’s easier to measure and so it’s better for aiming quickly. Really you should be looking at both, if you have the ability to.
Signal levels in dBm tell you whether the signal level is strong enough to get to the receiver. This is more important with long signal runs. In most cases you can get at least 150 feet from a DIRECTV cable, if you’re using the right parts. If your signal is too weak you’ll also have a high bit error rate because the receiver won’t be able to tune the signal.
When to use signal level in dBm
You should test signal level in dBm when you are first aiming the dish, because it’s faster. However, the real use for signal level measurements is in long runs. Cables aren’t perfect and online calculators can only do so much in telling you whether the signal is strong at the receiver. Test the signal level at the receiver to make sure it’s between -40 and -60dBm. (numbers closer to -40 are better, numbers closer to -60 are worse.)
When to use bit error rate and the signal meters on the TV
Use the signal meters on the TV, or a meter that shows bit error rate, to determine if you’re actually getting a usable signal. For a tailgater or DIYer, this is usually the only method you’ll need. The exception to that rule is if one TV isn’t behaving while the others are. Bit error rate measurements could lie if the cable run is long or if the cable itself is damaged.

Be the first to comment on "The signal meters on your receiver are great. Except when they’re not."