
I promise, this isn’t going to be a long article.
If you’ve been a DIRECTV subscriber for a long time, you probably remember adding a Genie Client to your system. For users of older Genie equipment, the process hasn’t changed much since I wrote this short guide in 2012. For those folks with the latest Genie hardware, it’s even easier.
Forget about the “PIN.”
The older Genie hardware has you add a client by getting a 4-digit code on the DVR and then typing it into the client. This could be a bit of a pain and have you running from room to room.
Luckily those days are gone. With the HS17 AT&T has implemented what they call “Full Client Tracking.” This means that if the client is registered on your account then it will add automatically in most cases. No PIN will be required.
I’m serious, it’s just this easy.
Step 1: Call SolidSignal at [email protected]
Anytime you add new hardware it needs to be activated. This is true of any receiver or client in the past so this step isn’t new. When you call, have the client box with you so you can read off some numbers. It may also help you to have a DIRECTV bill near you or have access to DIRECTV.com where you can get your account number.
If you don’t have your account number, don’t fret. A lot of times we can get it with just your name and phone number. Solid Signal’s reps have access to the same computer systems as any AT&T customer rep so if that information is there, our people can see it.
When you read off the numbers on the client box, it will be added to your account and your Genie 2 will get the new authorizations, generally within 7 minutes. A lot of times it’s much faster than that.
Step 2 (wired clients): turn on the TV.
Seriously. That’s all there is. Once the client has been added to your account it should just work.
If you want to copy settings that have been used on another client, you can do that easily. This will move favorites lists and other preferences to the new client which makes it easier to get on with your life if you’re replacing a client.
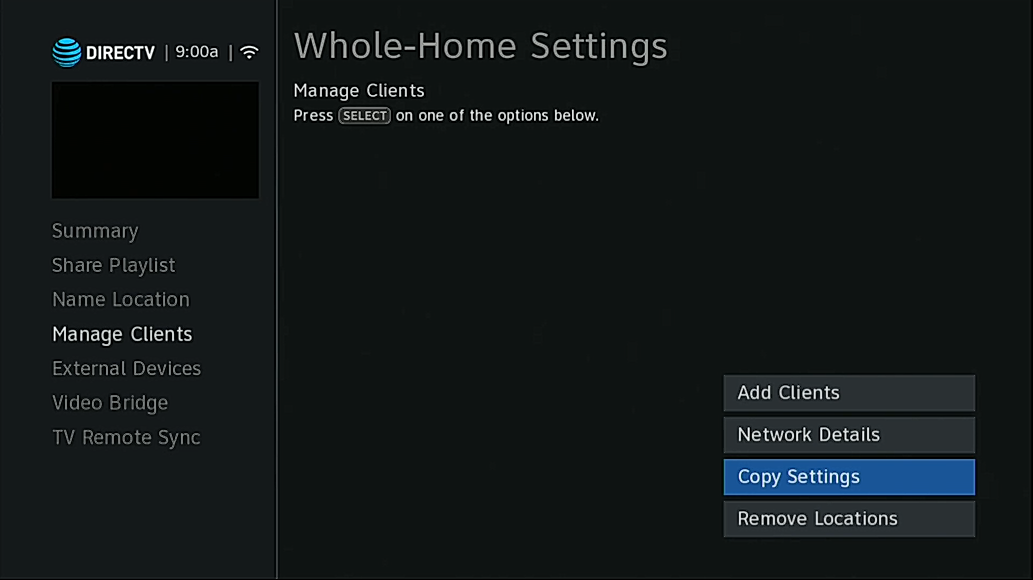
- Press MENU then scroll to Settings.
- Next, Arrow over to Whole Home and press SELECT.
- Arrow down to Manage Clients and press SELECT.
- Arrow over and down to Copy Settings and press SELECT.
From there you can choose a previously created set of favorites to copy over. In that same Whole Home screen you can assign a name to the client if you want and get the remote synched up..
Step 2 (wireless clients): turn on the TV.
In a lot of cases a wireless client will just connect to the Genie 2 by itself. However, if it doesn’t, the process of adding a wireless client is almost as easy as adding a wired one.
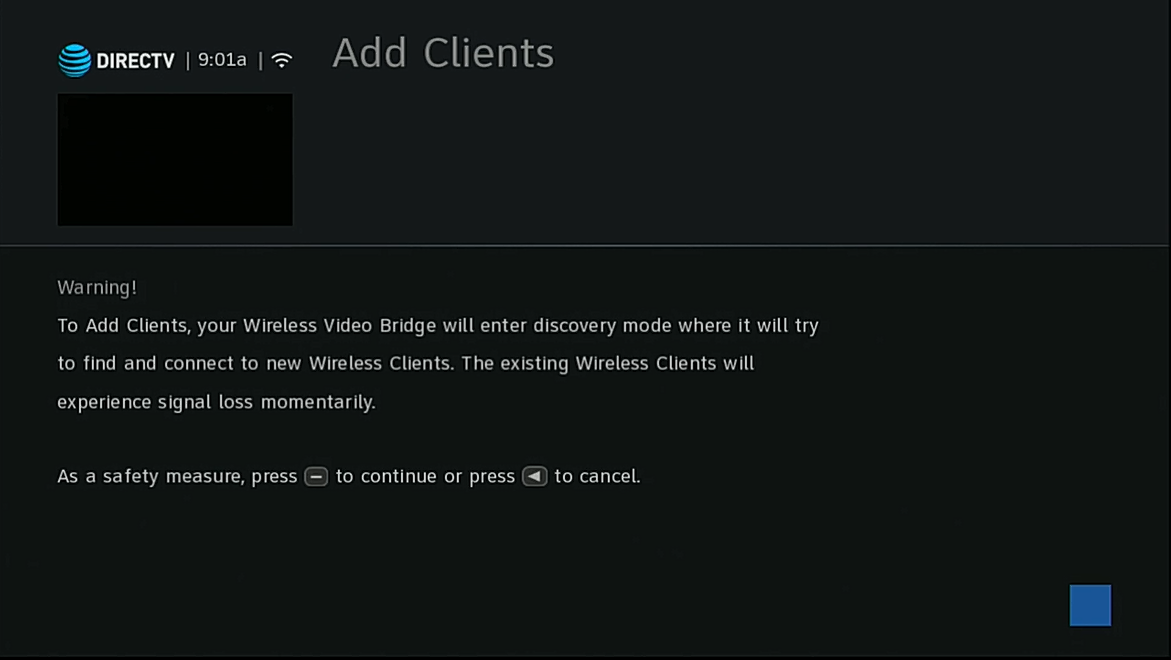
Using the same steps as the wired client, press MENU then go to Settings, Whole Home, and in this case choose Add Clients. This will put the Genie 2 into “discovery mode” where it will be easier for the client to find it.

There’s also a helpful “Add Client” button at the top of the HS17 Genie 2 that does the same thing. Either way it works the same. The client should be found automatically and before you know it, you’re watching TV.


Do you have to buy equipment from Solid Signal in order for you guys to activate it?
No we can activate any equipment.