
Recently, one of the folks I work with pointed out that there isn’t a good tutorial on the web for setting a static IP address for your DIRECTV devices. So, I set out to fix that.
What is a static IP address?
First of all, you’re probably aware that all of the computer equipment you use has a set of four numbers associated with it called an IP address. There are a lot of rules for how to use these numbers, but for the most part you don’t have to worry about them. Every router has the ability to use the Dynamic Host Configuration Protocol (DHCP). This system automatically assigns IP addresses from a pre-defined pool. Devices that get IP addresses from DHCP might have one address one day, one address the next. If you want your device to always have the same IP address, you’ll need to set it manually. We call that a “static IP address.”
Why you would need a static IP address
In most cases, your DIRECTV equipment works just fine and connects to the internet by itself. However, commercial customers do have a reason for setting static IP addresses. If you’re in a situation with more than one receiver, and you want to use DIRECTV’s Business app to control all of them from one location, setting a static IP address is the way to go. This is also true in any other situation where you have a lot of receivers and want to make sure you can access just one of them. It holds true in hotels, headends, all those things.
Step 1: Find out your DHCP address pool
It’s a best practice to make sure that all your static IP addresses are outside the DHCP address pool. In other words, if your router assigns addresses that end in 1 through 100 automatically, you would want to assign a manual address from 101 to 255. (IP addresses cannot go higher than 255.)
This means logging into your router and looking for that information. Unfortunately pretty much every router is different so it’s hard to tell you what to look for. It’s going to be somewhere in the configuration section. If you can’t log into your router, you can get an app like iNet which will show you IP addresses in use on your network. This will give you a pretty good idea what addresses to avoid.
Step 2: Find out your basic IP addressing scheme
In order to assign a static IP address, you need to know how the network is set up. If you’re comfortable logging into the router, this is easy to find generally. If you aren’t able to log into the router, you can get this same information from an app like iNet, or from a PC.
- From a PC, press [Windows Key] + R and type powershell then press the RETURN key.
- When the window pops up, type ipconfig and press the RETURN key.
You will get a lot of information. The top set of information is what you’re looking for. It should look something like this:

This is the information you are looking for. Your IP addressing scheme is the first three numbers of the IPv4 address. In this case it’s 192.168.1.x, but yours might be 192.168.0.x or something else.
Take note of the subnet mask and gateway, you’ll need that when you set a new address.
Setting a static IP address on a DIRECTV receiver
This is done from the actual receiver. On most DIRECTV hardware, press MENU, then follow these steps:
- Choose “Settings and Help”
- Choose “Settings”
- Choose “Internet Setup”
- Choose “Advanced Setup”
You will see a screen similar to this one:
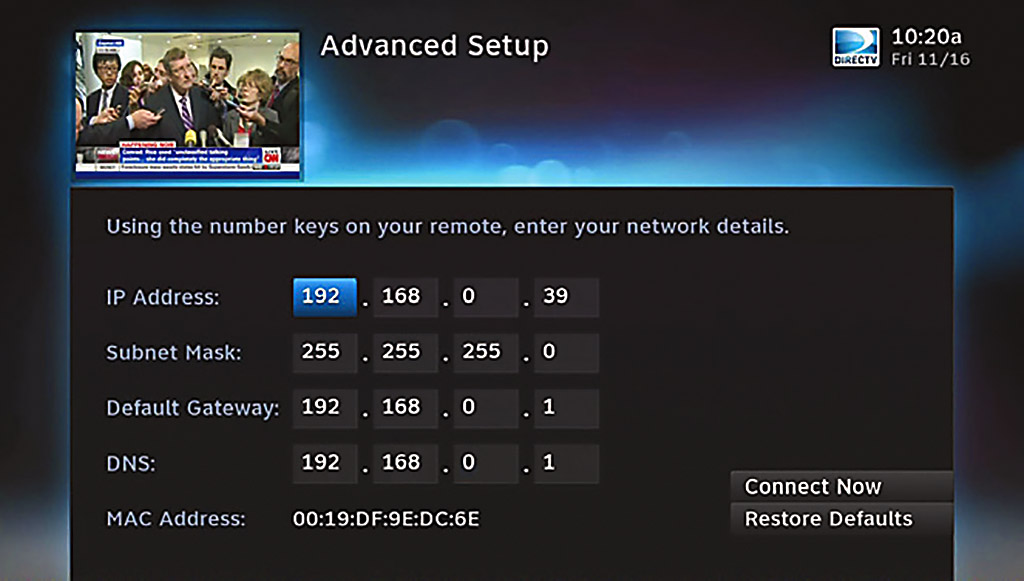
This will let you set that static IP address.
- For IP address, use the first three numbers of the IP addressing scheme, that you got earlier.
- For the fourth number, use something out of the DHCP pool, if at all possible.
- For subnet mask, use the subnet mask that you got earlier.
- For default gateway and DNS, use the default gateway you got earlier.
When you are done, press “Connect Now” and there will be a short test. If you’ve done everything right, it should all work and you will be connected.
NEW: Using the H44 Commercial Receiver (or any Genie client)
You can get to the same screen on an H44 Commercial Receiver, or any Genie hardware, by pressing MENU and following these steps:
- Select “Settings.”
- Select “Internet Setup.”
- Select “Advanced Setup.”
- Select “Advanced IP Config.”
This will take you to a screen where you can set everything manually.
More questions?
If you’re still confused, give the experts a call! We’re here for you during East Coast business hours. Email us at [email protected] or fill out the form below!

Be the first to comment on "2022 Edition: How to set a Static IP address for your DIRECTV receiver"