
Click or tap here for a tutorial on using the newer Genie Menus.
DIRECTV gives you powerful options for watching TV. Let’s face it, it’s pretty annoying when you sit down at your TV and something’s not right. Maybe you don’t like black bars at the left and right, or maybe you are tired of looking at a zoomed-in picture. Whether it’s your own TV or you’re just visiting someone else, you want to watch TV your way.
DIRECTV’s formatting settings are different from DISH’s. First, if you’re on an HD channel (using an HDTV), the format settings have no effect other than forcing the resolution. On the other hand, if you’re on an SDTV, the format settings only apply to the HD channels.
Here’s what they do:
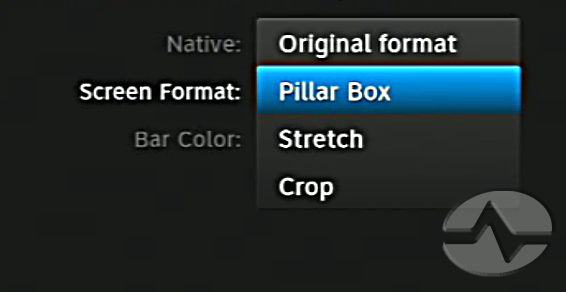
Original format: This is the option to pick if you have a high-end TV that has advanced options for scaling. It passes along the signal in its 100% pristine state.
Pillar Box: This option puts bars at the left and right of the image. You can control the bar color by going deep into the display options ({MENU},Settings&Help,Settings,Display,Preferences). If you are on an SDTV that’s set up properly, this option is called “Letter Box” and puts bars at the top and bottom of the image.
Stretch: Tired of seeing those bars? Use Stretch to fit the image to your screen. Some people would rather have a stretched image… and that’s cool.
Crop: This fills the screen and keeps the image from getting stretched by enlarging the center of the screen.
Remember, these options don’t apply to HD content (on an HDTV.) If you are watching a show on an HD channel and it’s got built-in black bars, you can’t change that through your receiver or DVR. It’s possible that you can use the scaling options on your TV instead… choose Original Format and then use your TV’s remote.
There are three ways to change the screen formatting. The easiest, but least powerful, is to use the {FORMAT} button on the remote. Keep pressing this until the option you want to see is selected. By doing so, you’ll also be changing the resolution, and this resolution choice will stay until changed again. (HINT: to quickly cycle resolutions without changing formats, use the {RES} button on the front panel of the receiver or DVR.
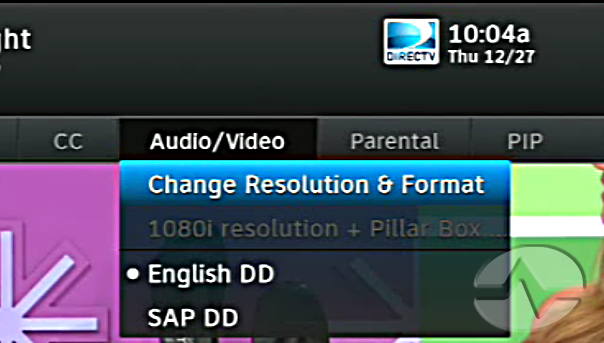
If you’d rather go through the menus, you can do the same by pressing {INFO} and scrolling over to “Audio/Video” then down to “Change Resolution and Format.” Press {SELECT} You’ll see the format change and you can press {SELECT} on your remote to go to the next resolution. The format is listed in grey in that same menu.
The most powerful method is found deep in the menu structure. Here are the steps:
- Press {MENU}
- Arrow to “Settings and Help” and press {SELECT}.
- Arrow to “Settings” and press {SELECT}.
- Arrow to “Display” and press {SELECT}.
- Arrow to “Video” and press {SELECT}.
- Arrow to “Screen Format” and press {SELECT}.
- Use the arrows to select the format you want and press {SELECT.}
- Press {EXIT} to go to live TV.
This is the best method because it doesn’t change the resolution at the same time and even though it seems like more key presses, it usually ends up being fewer, because you don’t have to cycle back through all the resolutions.

[no joke]
My neighbor thought her flat screen was going bad, because the captions were cropped.
Found the Vizio remote and pressed “the wide button” .
[no joke]
My neighbor thought her flat screen was going bad, because the captions were cropped.
Found the Vizio remote and pressed “the wide button” .