Networking can be hard. When you’re connecting a computer network to a complex home theatre system, it can be even harder. DIRECTV provides tools and parts for connecting its receivers and DVRs, but they don’t always make it easy to understand what you need to do. There are several generations of equipment and several different ways of doing the same thing. Add to that, there are some parts that have very similar names but do different things!
This guide will give you an overview of the different ways that DIRECTV receivers can be networked.
This document is available in PDF format! Click here to download!
In the beginning, there was Ethernet.

Before 2006, DIRECTV receivers didn’t have any network connections. However, almost every receiver made since then has had a jack for a plain old ethernet cable. The following receivers can all be connected via ethernet:
- HR20
- HR21
- HR22
- HR23
- HR24
- HR34 Genie
- HR44 Genie
- THR22 (TiVo)
- H21
- H23
- H24
The only receiver that’s been made in the last three years without Ethernet is H25. Due to its small size, there just isn’t room for an ethernet jack on the H25.
If you already have networking experience, you might be tempted to connect all your receivers and DVRs using Ethernet. The procedure is easy: connect all the receivers to your home network. Then, on each receiver follow these steps:
- {MENU}, then Arrow down to “Settings and Help” then press {SELECT}
- Make sure “Settings” is highlighted and press {SELECT}
- Arrow down to “Network Setup and press {SELECT}
- Make sure “Connect Now” is highlighted and press {SELECT}
You need to be aware that DIRECTV no longer supports Ethernet networking for whole-home viewing. You can still access on-demand content, TVApps and IPTV features like Pandora and YouTube, but without paying $2.99 for Whole-Home service, you will not be able to share content between receivers.
If you want to use your Ethernet network for whole-home be aware that it’s technically possible but be prepared to spend hours on the phone with DIRECTV getting this turned on. The front-line DIRECTV CSRs won’t be able to do it for you, and you will be told over and over again that it can’t be done. If you spend enough time on the phone you can get Whole-Home activated for your Ethernet-connected receivers, but they sure don’t make it easy.
Coax Networking: “Don’t call me DECA”

There’s a lot of confusion about the term “DECA.” A lot of people use the term to mean networking using your satellite cables.This is actually just called Coax Networking. The idea is that all your receivers communicate with each other through the satellite cables. This creates a smooth, clean path for sharing HD video and makes it easier for DIRECTV techs to set up without disturbing the rest of your network. So what is a DECA? It’s a device that converts from ethernet to coax. That’s what the name means… DIRECTV Ethernet Coaxial Adapter.
DECA: DIRECTV Ethernet Coaxial Adapter
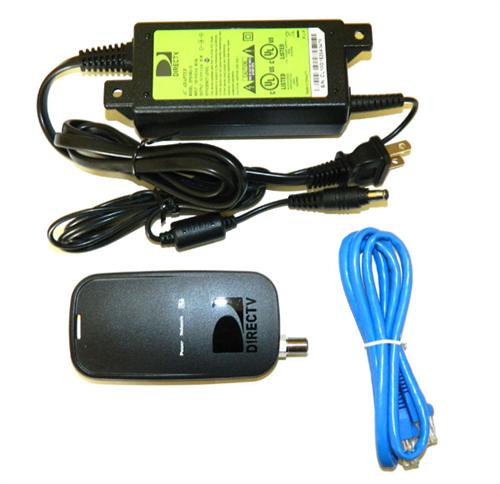
Anytime you want to convert from coax networking to ethernet networking, you need a DECA. DECA stands for “DIRECTV Ethernet Coaxial Adapter.” What you see is the Generation III DECA, but if you have the old-style white box DECAs they will work just as well.
The following receivers will use a DECA to convert the coax network signal to an ethernet one:
- HR20
- HR21
- HR22
- HR23
- H21
- H23
- R22
- THR22 (TiVo)
Because these receivers don’t have built-in coax networking, they need an adapter to convert the network part and put it into the receiver’s Ethernet port. Using a DECA is easy. Connect one end to the satellite cable and then connect BOTH the coaxial and ethernet cables to the receiver. Within a minute or two all the lights on the DECA should turn green indicating good communication.
You may need to do the “Connect Now” procedure to get networked on these receivers.
If you accidentally use a DECA on an H24, H25, HR24, or HR34 receiver it simply won’t work. As a rule of thumb, if it’s got a flat, touchscreen front, it doesn’t need a DECA in back.
DECA Broadband: Also called a Cinema Connection Kit
Here’s where it gets confusing. The device you see above you comes in a box marked “DECA BROADBAND.” At times it’s been referred to as a Cinema Connection Kit, but that term has gone out of fashion. This is the most recent version, but there has also been another version that looks like a small router. Both work identically.
The purpose of the DECA Broadband is to give internet access to your home network. You hook up one end to a coax cable attached to your satellite dish or multiswitch, and the other end is connected via Ethernet to your router. It’s self-configuring and should “just work” when you plug it in. If you see three green lights after it is plugged in and turned on, you’re all set. A yellow light means a bad line somewhere.
If you are using Ethernet networking, you don’t need a DECA Broadband. Trying to use both Ethernet and a DECA Broadband will just make all your receivers confused.
There is a wireless version of the CCK which is used when it’s not possible to get ethernet and coax in the same room. It supports WPS (Wireless Protected Setup) which allows for one-button setup. If your home router isn’t designed for WPS, it’s also very easy to set up the wireless CCK using any HD receiver that supports ethernet. Just temporarily connect it to that receiver’s ethernet port (and not the coaxial cable port) and go through the “Connect Now” procedure. Once it is part of your wireless network, disconnect the ethernet cable and connect a coaxial cable to make it part of your coax network.
All current HD receivers and DVRs, plus the standard-definition R22, can use coax networking, meaning one connection to the internet through the CCK will give on-demand features and whole-home sharing to all receivers.
Note: The Genie DVRs have built-in DECA Broadband functionality… wait a little while and we’ll get to that.
Turning a receiver DECA to a DECA Broadband
The only difference between a receiver DECA (meant to connect a receiver to a coax network) and a DECA Broadband (meant to connect the coax network to a router) is a power supply. If you have older DECAs around you can convert them to DECA Broadbands by adding a power supply.
DIRECTV does not sell the adapter required to turn its EPS10 power supply into a DECA power supply, but the Sonora PS121000A has been tested for this use and will work just fine. Just connect it to the short white cable end of the DECA and plug it into the wall. The ethernet cable can then be connected to the router or to any other ethernet device.
Why would you do this?
If you have a device that needs a wired network connection but there isn’t an ethernet cable handy, you can use an approved DIRECTV splitter and a Broadband DECA to create an instant Ethernet connection. You can even plug the DECA Broadband into a switch and plug several devices into it. We’ll show you how this works a little later.
HR24, H24, and H25 – No DECA required
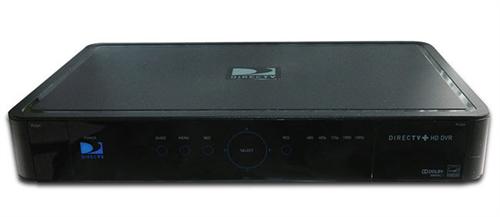
The DIRECTV HR24 DVR, H24, and H25 receivers were designed for coax networking from the start. Although the HR24 and H24 also have an Ethernet port, they work best when connected to a coax network. This has led some people to say they have “Built-in DECA.” They do have chips inside them that let them use coax networking without any other adapter, that’s what people are trying to say.
Connecting one of these receivers to a coax network should be automatic. If the coax network is present when they boot up, it will be recognized and configured. If it isn’t, the “Connect Now” procedure should work to quickly connect these boxes to the internet, as long as the DECA Broadband is already in place.
Genie DVRs don’t need a DECA Broadband
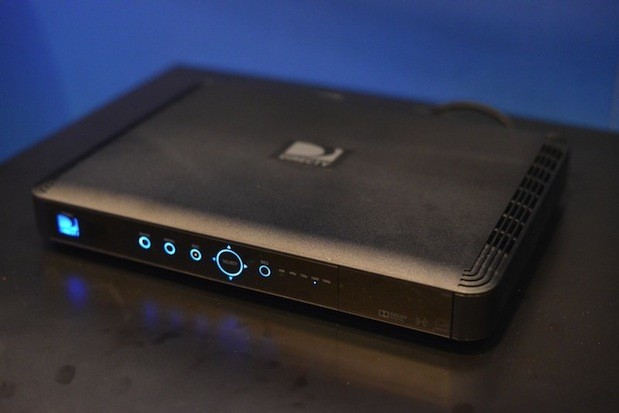
This is the HR44 Genie DVR. It was designed from the ground up to be the only DVR you’ll need in the home. Because of that, it can do tricks that other DVRs can’t, and it handles coax networking different from other DVRs.
With a Genie you don’t need a DECA Broadband. You can connect an ethernet cable straight to it and it will supply internet to all your other receivers. You can even connect via Wi-Fi. if you have an older HR34 Genie DVR, it can also connect via Ethernet and take the place of a DECA Broadband but it does not have built-in wireless.
In order to use a Genie to supply internet to your other receivers using a wired cable, just connect the cable and reboot the receiver. No other steps should be necessary. To use Wi-Fi, make sure that all other Broadband DECAs are removed (receiver DECAs are ok) and go through the “Connect Now” procedure:
- {MENU}, then Arrow down to “Settings and Help” then press {SELECT}
- Make sure “Settings” is highlighted and press {SELECT}
- Arrow down to “Network Setup and press {SELECT}
- Make sure “Connect Now” is highlighted and press {SELECT}
At that time you should be asked what kind of network adapter you are using. Choose “Wireless.” Be prepared to choose your router by name and enter in the security key. Remember that security keys are case-sensitive.
Note: Unlike other receivers, it’s not a good idea to connect your receivers via ethernet cables if you are using a Genie. If you choose to connect all your receivers that way, you will have to use a band stop filter to disable the Genie’s built-in DECA Broadband function.
Basic Coax Networking, Step 1: Installing the Band Stop Filters (if necessary)
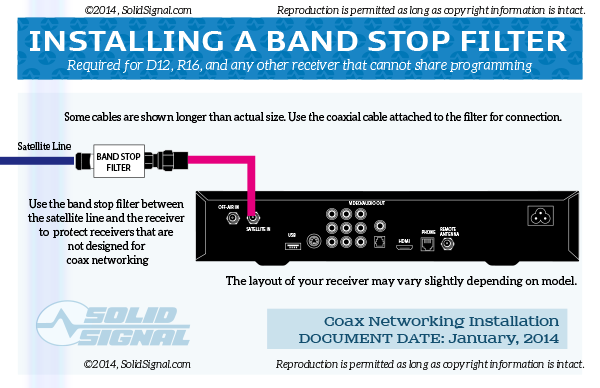
In order to prepare your DIRECTV system for coax networking, the first step is to install band stop filters on any equipment that is not designed for networking, or any equipment you do not want to network.
The Connected Home signal that is used in coax networking is very strong compared to other signals on the line and can overpower that signal, possibly leading to damaged receivers. In order to keep these receivers from getting damaged, we use band stop filters. The band stop filter stops the Connected Home signal from reaching the receivers. It can also be used in a room such as a child’s bedroom that you want to shield from the rest of the home.
You will need the following:
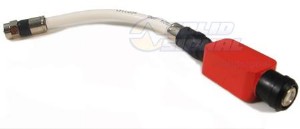
DIRECTV Band Stop Filter (BSFR01) from Solid Signal)
The following receivers do not receive the connected home signal:
- D10
- D11
- D12
- R10
- R15
- R16
- H10
- H20
Of these, the D12 and R16 should have band stop filters if they are connected to the SWM outputs. Other receivers only connect to the legacy ports and do not need Band Stop filters.
Installation is simple. Disconnect the satellite cable from the receiver and connect it to the band stop filter. Then, connect the attached coaxial cable on the filter to the receiver. The following diagram shows installation of a band stop filter.
Basic Coax Networking, Step 2: Installing the DECAs (if necessary)
The next step is to start building the coax network. If you are already on a SWM system, you are already 90% there. Check the back of your DVRs. If you have only one line into every DVR, you are already on a SWM system. You can also check by pressing the {DASH} button on your remote while watching TV. If it says “SWiM Connected” then… you are.
The current generation receivers and DVRs are built for coax networking. If your receiver or DVR has a flat front panel with no raised buttons, or if you have the H25 receiver (the little tiny one) then you do not need an additional adapter. However, older receivers and DVRs do need a DECA — a DIRECTV Ethernet Coaxial Adapter — to use coax networking. This adapter splits out the network information and puts it on an ethernet cable that connects to your receiver or DVR.
The following DIRECTV boxes need a DECA for coax networking:
- HR20
- HR21
- HR22
- HR23
- H21
- H23
- R22
- THR22 (TiVo)
You will need the following (one for every receiver that requires it)
DIRECTV DECA II Ethernet to Coax Adapter DECA (DCA2SR0) from Solid Signal)
You can use the older-style white-box DECAs if you have them.
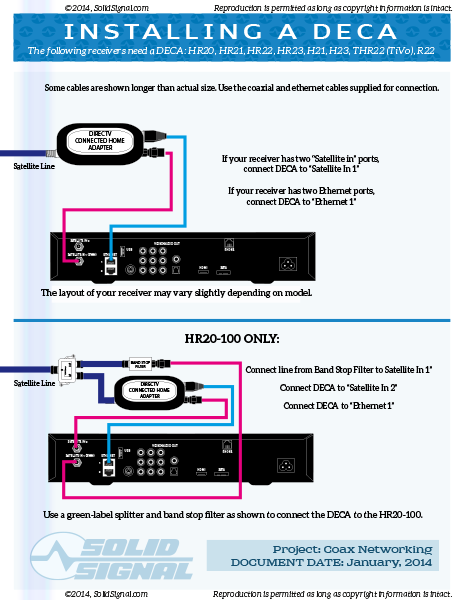
With all these receivers (except the HR20-100) connection is very easy. Disconnect the satellite line from the back of the receiver. Connect it to the DECA, then connect the DECA to both the Satellite in 1 and Ethernet 1 ports. (if you only have one satellite in port and one ethernet port, connect to those.)
Unfortunately, the HR20-100 requires extra steps to add a DECA. The HR20-100 was never designed to provide enough voltage to power a DECA, so you have to use a few more steps. The HR20-100 is silver and you can confirm the exact model number by checking the sticker inside the access card door.
You will need the following:
DIRECTV DECA II Ethernet to Coax Adapter DECA (DCA2SR0) from Solid Signal
(The older white box-style DECA will work as well)
DIRECTV Band Stop Filter (BSFR01) from Solid Signal)
DIRECTV SWS-2 Satellite 2-Way Wide Band MRV Compatible Splitter (2 -2150 MHz) from Solid Signal
Solid Signal Custom Cable Lengths RG6 with High Quality Solid Signal Connectors from Solid Signal (two short cables if needed)
Disconnect the coaxial cable from the receiver and connect it to the splitter.
Connect one line from the splitter to the band stop filter, and then to the receiver’s “Satellite In 1” port.
Connect the other line from the splitter to the DECA, and then to the receiver’s “Satellite in 2” and “Ethernet 1” ports.
The following diagram shows the proper installation of a DECA on receivers that require one.
Basic Coax Networking, Step 3: Installing the DECA Broadband
The next step is installing the DECA Broadband. The DECA Broadband provides a link between all your receivers and the internet. It should be located in a room where there is an ethernet line, either directly into the home router or into a switch.
This procedure is for the wired DECA Broadband; the wireless Cinema Connection Kit will be covered later. If you have a Genie DVR and wish to use it in place of a DECA Broadband, that will also be covered later.
You will need the following:
DIRECTV DECA Broadband (Cinema Connection Kit) from Solid Signal
The easiest way to connect a DECA Broadband is to come from an open port on a splitter into the coax connection on the DECA Broadband. Connect the ethernet cable from the DECA Broadband to the router or switch, and plug the power supply into a wall outlet.
If you have no open ports on your splitter, you can use the following parts as well:
Solid Signal Custom Cable Lengths RG6 with High Quality Solid Signal Connectors from Solid Signal (two short cables if needed)
NAS STD-9501M Satellite / Off Air Diplexer Power Passing (STD-9501) from Solid Signal)
Connect the DECA Broadband to the TV port of the STD-9501M. Connect the line from your dish or multiswitch to the Cable/Sat port. Then connect the DECA Broadband to your router or switch, and plug it in to a wall outlet. Connect the output line from the STD-9501M to the input of the splitter.
The advantage of this method is that you may be able to avoid using a larger splitter which would potentially cause signal loss. Remember, we always want to use the smallest possible splitter.
The following diagram shows the proper installation options for a DECA Broadband.

Basic Coax Networking, Step 4: Getting Connected
At this point, after about 5 minutes you should have all green lights on every DECA and on the CCK. If not, check your connections. A light that is not lit means that something is disconnected; an amber light means poor connectivity.

Now, reboot every receiver and after live TV comes up, press the {DASH{ button to the left of the zero. You should see a message that says “Internet Connected.” If you don’t, try the “connect now” procedure:
- {MENU}, then Arrow down to “Settings and Help” then press {SELECT}
- Make sure “Settings” is highlighted and press {SELECT}
- Arrow down to “Network Setup” and press {SELECT}
- Make sure “Connect Now” is highlighted and press {SELECT}
All your receivers should now say, “Congratulations, your receiver is now connected to the internet.” If not, check your connections.
At this point, if you are trying to share programs between receivers, follow these steps:
- {MENU}, then Arrow down to “Settings and Help” then press {SELECT}
- Make sure “Settings” is highlighted and press {SELECT}
- If “Whole-Home” is on the menu, arrow down to it and press {SELECT}
- Set the options as you wish
If there is no menu for Whole-Home, you will have to call DIRECTV for them to enable Whole-Home on your account. This is an additional $2.99 charge and they will want to send a truck. Be very patient you should be able to convince them to turn this on for you.
Installing a Wireless Cinema Connection Kit
The Wireless Cinema Connection Kit (CCK) can be a little harder to install. There are several choices you must make.
You will need the following:
DIRECTV CCK-W Wireless DECA Cinema Connection Kit (CCK-W) from Solid Signal)
Within the box, you’ll find a short ethernet cable and a short coaxial cable.
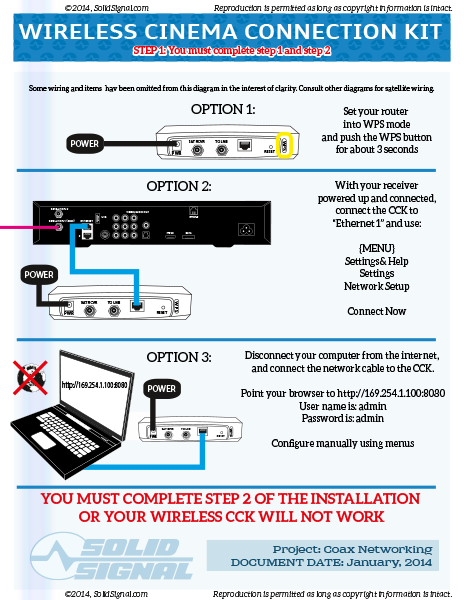
First, use one of the following procedures to connect the CCK to your home wireless network.
OPTION 1:
- If your home network is set up for Wireless Protected Setup (WPS), put your router in WPS Mode.
- Plug the CCK into a power outlet and wait roughly 1 minute for bootup.
- Press the (WPS) button on the side of the CCK.
OPTION 2:
- Bring the CCK into a room that has a DIRECTV receiver connected.
- Plug the CCK into a power outlet and wait roughly 1 minute for bootup.
- Using the supplied cable, connect the CCK to your receiver’s “Ethernet 1” port. If there is only one port, use that.
- Use your remote for the following steps:
- {MENU}, then Arrow down to “Settings and Help” then press {SELECT}
- Make sure “Settings” is highlighted and press {SELECT}
- Arrow down to “Network Setup and press {SELECT}
- Make sure “Connect Now” is highlighted and press {SELECT}
- Follow the onscreen prompts to set up a Wireless adapter. You will need to know your wireless security key.
OPTION 3:
- Bring the CCK into a room that has a computer, or bring the computer to the CCK.
- Disconnect the computer from the internet. This may involve turning off its wireless adapter.
- Plug the CCK into a power outlet and wait roughly 1 minute for bootup.
- Open a browser window and navigate to http://169.254.1.100:8080
- When prompted for a username and password, use admin for both
- Follow the onscreen menus to set up the CCK. You will need to know all the details of your wireless network.
No matter how you do it, you will know it’s right when both the “POWER” and “WLAN” lights are green.
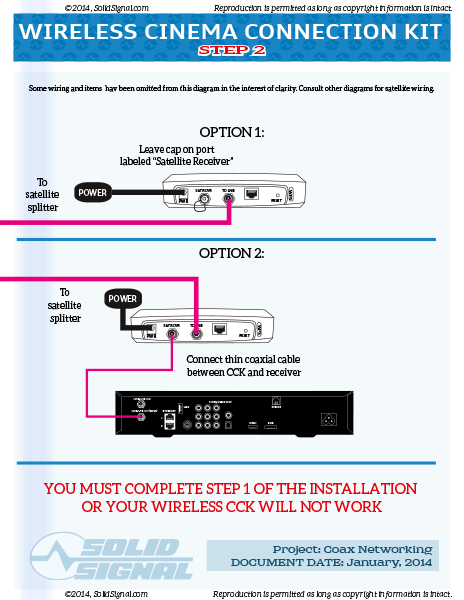
The following diagram describes the three options for connecting a Wireless CCK.
Installing a Wireless Cinema Connection Kit, step 2
After you have successfully joined your Wireless CCK to your home network you have two options for placement.
OPTION 1:If you have an open port on your splitter and do not want it in the same room as a DIRECTV receiver:
- Make sure the CCK is plugged into a power outlet and both the POWER and WLAN lights are green.
- Connect a cable from the splitter to the “To LNB” port on the CCK.
- Make sure the “Satellite Receiver” connector on the CCK is capped off.
OPTION 2:If you want to leave it in the same room as your DIRECTV receiver:
- Disconnect the satellite line from the receiver.
- Make sure the CCK is plugged into a power outlet and both the POWER and WLAN lights are green.
- Uncap the “Satellite Receiver” connector on the CCK.
- Use the short coaxial cable to connect the Satellite Receiver port to your receiver’s “Satellite 1” port (or if there is only one port, use that.)
When the system is properly connected you should have four green lights. The AP/STA light is not used.
The following diagram shows step 2 of the installation procedure.
Using a Genie DVR in place of a DECA Broadband
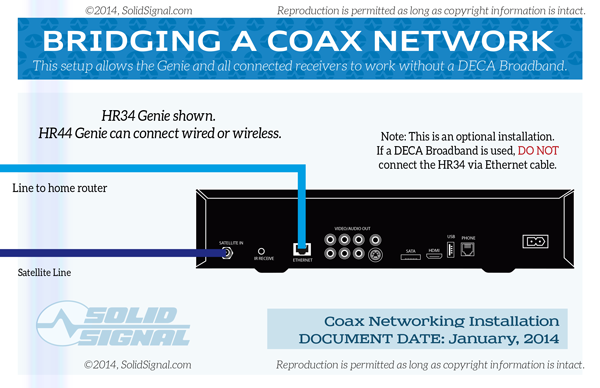
The Genie DVRs can be used to take the place of a DECA Broadband, because they have the same electronics as a DECA Broadband within them. Newer Genie DVRs have the option of wired or wireless, while the older HR34 Genie is wired only.
Note: You don’t have to do it this way. If your Genie DVR is not near an ethernet connection or you have poor wi-fi coverage you can use a wired or wireless CCK just as you would with any other receiver. However, if you have wired or wireless ethernet access to your Genie you can save money by not purchasing that CCK.
If you want to connect wired, you’ll need your Genie DVR and a combination of parts including:
Netgear ProSafe FS105 5-port 10/100Mbps Ethernet Switch (FS105) from Solid Signal or any wired switch
7 ft Enhanced Category 5 Cable – Grey (CATPC7GRY) from Solid Signal or any Category 5e or Category 6 cables (or you can make your own)
Installation is simple. Connect both the satellite and ethernet cables to the Genie and perform the “Connect Now” procedure:
- {MENU}, then Arrow down to “Settings and Help” then press {SELECT}
- Make sure “Settings” is highlighted and press {SELECT}
- Arrow down to “Network Setup and press {SELECT}
- Make sure “Connect Now” is highlighted and press {SELECT}
If you want to connect wirelessly, go through the same procedure but don’t connect the Ethernet cable. When you choose “Connect Now” you will have the option to choose “Wireless” as your connection method and from there you can select your network and enter your security key.
Here’s a diagram showing connection of the Genie in place of a DECA Broadband. Remember that HR44 Genies can also connect via Wi-Fi.
Providing Ethernet access to other rooms using a DECA Broadband
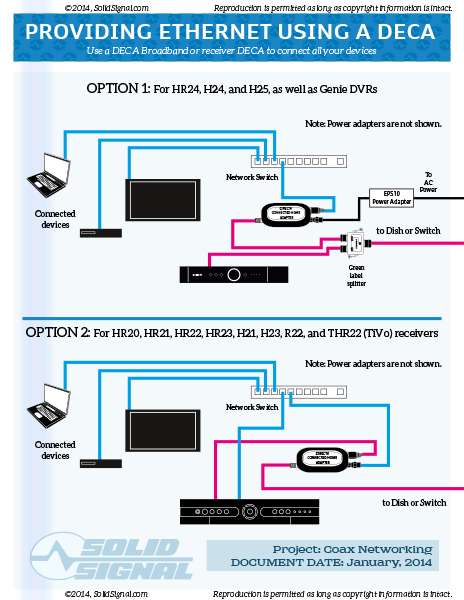
Coaxial cable is a great way to get your home theatre equipment networked, and it’s easy to do. If you already have a coax line to that room, you can use a cinema connection kit to provide ethernet to any connected devices.
OPTION 1:To be used for HR24, H24, H25, and HR34 receivers that do not require a DECA
You’ll need a combination of parts including:
DIRECTV SWS-2 Satellite 2-Way Wide Band MRV Compatible Splitter (2 -2150 MHz) from Solid Signal
Netgear ProSafe FS105 5-port 10/100Mbps Ethernet Switch (FS105) from Solid Signal or any wired switch
7 ft Enhanced Category 5 Cable – Grey (CATPC7GRY) from Solid Signal or any Category 5e or Category 6 cables (or you can make your own)
Solid Signal Custom Cable Lengths RG6 with High Quality Solid Signal Connectors from Solid Signal
To install:
- Place a 2-way splitter between your cable line and your devices. Connect the DIRECTV receiver to one output port, and the Cinema Connection Kit to the other.
- Connect the Cinema Connection kit to a network switch, and connect all other devices to the same switch.
OPTION 2:To be used for HR20, HR21, HR22, HR23, H21, H23, R22 and THR22 (TiVo) receivers that do require a DECA
You’ll need a combination of parts including:
DIRECTV DECA Receiver II Ethernet to Coax Adapter DECA2 (DCA2SR0) BBDECA from Solid Signal (if you do not already have one at that location)
Netgear ProSafe FS105 5-port 10/100Mbps Ethernet Switch (FS105) from Solid Signal or any wired switch
7 ft Enhanced Category 5 Cable – Grey (CATPC7GRY) from Solid Signal or any Category 5e or Category 6 cables (or you can make your own)
Solid Signal Custom Cable Lengths RG6 with High Quality Solid Signal Connectors from Solid Signal
To install:
- If there is a DECA connected to the receiver, disconnect it. Otherwise disconnect the satellite cable from the receiver.
- Connect a DECA (if there isn’t one) to the satellite cable and to the receiver. Connect the ethernet cable to the switch.
- Connect an ethernet cable from the switch to the receiver and your other connected components.
Here’s a diagram showing how to use a DECA Broadband to expand your home networking.
If you’re having problems sharing programs between your receivers, or if you’re having problems with on-demand content, you might want to try some quick diagnostic steps.
Check to make sure you have internet on your computer or other devices. The first thing to check is whether or not your internet is down. If it is, you have another whole problem.
Check all the DECAs for green lights The DECAs in your home should have nothing but green lights, and all lights should be lit. An unlit light means something’s not connected, and a yellow light means a bad connection.
If it’s just one receiver, reboot it to see if the problem goes away.
Try resetting the network settings on problem receivers using {MENU}, Settings&Help, Settings, Network Setup… then highlight “Restore Defaults” then “Connect Now.” If it doesn’t work, you will get additional information that may help you take the next step.
Note that the maximum distance between any two devices on your coax network is less than 250′. If you have receivers that are further away than that, it may not be possible to connect them. Check our Advanced Coax Networking white paper for more troubleshooting tips.


